
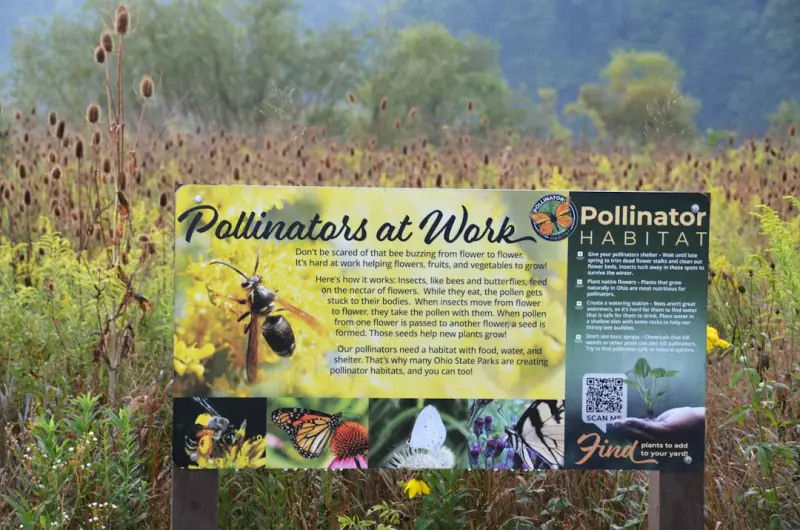
Why Your Backyard Should Be a Pollinator Highway
When I first moved into a suburban cul‑de‑sac, the yard was a bland expanse of lawn, a few ornamental shrubs, and a sprinkler that sputtered more than it watered. I liked the neatness, but something felt missing—a sense of life beyond the occasional robin. It wasn’t until a neighbor handed me a handful of native wildflower seeds that I realized my yard could be more than a visual backdrop; it could become a bustling thoroughfare for bees, butterflies, and even hummingbirds. The transformation from a manicured lawn to a thriving pollinator corridor is less about grand gestures and more about intentional, bite‑size actions that any homeowner can adopt.
Understanding the Pollinator Puzzle
Pollinators are the unsung workhorses of our food system. While you might picture honeybees buzzing over a field of clover, the reality is a mosaic of species—solitary bees, bumblebees, hoverflies, moths, and butterflies—each with its own dietary needs and flight periods. The key to attracting this diversity lies in providing continuous bloom from early spring through late fall, offering a variety of flower shapes, colors, and sizes, and ensuring there are safe nesting sites.
One common misconception is that a single, showy plant will do the trick. In truth, a single species might bloom for only a few weeks, leaving pollinators hungry the rest of the season. Think of your garden as a buffet line: the longer the line stays open, the more guests stick around.
Mapping Your Yard: From “Dead Zones” to “Hotspots”
Start by walking the perimeter of your property with a notebook (or a note‑taking app). Identify three categories:
- Dead zones: Sun‑baked patches of grass that never see a flower.
- Potential hotspots: Areas that get at least four hours of sun and already have some structure—like a fence, a wall, or a trellis.
- Existing assets: Mature trees, shrubs, or garden beds that already host insects.
Once you’ve charted these zones, you can strategically plant native species that fill the bloom gaps. For instance, Early Spring can be covered with crooked‑stemmed violet or Salvia nemorosa. Mid‑summer sees Bee Balm and Black-eyed Susan, while Goldenrod and Asters carry the party into autumn.
Selecting the Right Plants: Native First, Exotic Second
Native plants have evolved alongside local pollinators, making them the most efficient nectar sources. They also tend to be low‑maintenance, drought‑tolerant, and resistant to local pests. Here are five native staples that thrive in most North American suburbs:
- Coneflower (Echinacea spp.) – A magnet for bees and butterflies; its seed heads feed birds in winter.
- Milkweed (Asclepias spp.) – The sole food for monarch caterpillars, plus it attracts a swarm of honeybees.
- Coreopsis (Coreopsis tinctoria) – Long‑blooming and drought‑resistant, perfect for sunny borders.
- Goldenrod (Solidago spp.) – Contrary to popular myth, it doesn’t cause allergies and provides a late‑season nectar burst.
- New England Aster (Symphyotrichum novae‑angliae) – Dark‑purple flowers that draw late‑fall pollinators and offer seed for finches.
If you love a splash of color beyond the native palette, sprinkle in a few well‑chosen exotics—like Lavender or Salvia officinalis—but keep them to no more than 20% of your planting area to avoid outcompeting the natives.
Designing for Continuous Bloom
Think of your garden as a timeline. Plot each plant’s bloom window on a simple spreadsheet and look for gaps. If there’s a lull between June and August, consider adding a mid‑season bloomer like Bee Balm (Monarda). For a seamless transition into fall, incorporate Heath Asters or Joe‑Pye Weed. By layering these bloom periods, you create a “pollinator runway” that keeps insects on the move throughout the growing season.
Creating Nesting Sites and Shelter
Pollinators need more than food; they need places to raise their young and hide from predators. Here are three low‑effort ways to provide shelter:
- Bee hotels: Simple bundles of hollow bamboo canes, drilled wood blocks, or reclaimed logs with drilled holes (just be sure the holes are 3‑10 mm in diameter).
- Ground‑nesting habitats: Leave a patch of bare, well‑drained soil (about a foot square) in a sunny spot. Avoid treating it with herbicides.
- Dead wood and leaf litter: A few strategically placed logs and a mulch layer offer overwintering sites for solitary bees and beetles.
Even the humble garden shed can double as a refuge if you leave a corner undisturbed and add some rough bark or straw.
Water, Light, and the Energy Factor
While the focus of a pollinator garden is flora, water and lighting play supporting roles. Drip irrigation or a low‑pressure soaker hose can keep your native plants thriving without waste. If you’re interested in extending pollinator activity after sunset—perhaps to watch moths dance—you can integrate solar‑powered garden lights that emit a warm, low‑intensity glow. Choose amber LEDs that attract nocturnal insects without overwhelming them.
Managing Pests the Natural Way
Because native plants are adapted to local insects, they often experience fewer pest outbreaks. However, occasional aphids or spider mites may appear. Instead of reaching for synthetic sprays, try these eco‑friendly tactics:
- Companion planting: Plant garlic or chives near susceptible species; their sulfur compounds repel many soft‑bodied insects.
- Beneficial insects: Ladybugs, lacewings, and predatory wasps naturally keep aphid populations in check. You can attract them by planting dill, fennel, or yarrow.
- Soap sprays: A mild solution of insecticidal soap (1 tsp liquid soap per quart water) can be sprayed on affected foliage without harming pollinators if applied early morning.
Remember, a small amount of pest damage is a sign of a healthy ecosystem—it means predators are doing their job.
Integrating Edible Elements
If you’re also a food lover, merge pollinator-friendly planting with edible harvests. Herbs like thyme, oregano, and lavender provide nectar and can be snipped for the kitchen. Fruit shrubs—such as blueberry, raspberry, and currant—offer blossoms that attract bees and later produce berries for you. This dual‑purpose approach maximizes square footage and deepens your connection to the garden’s cycles.
Measuring Success: A Simple Observation Log
After a season or two, you’ll want to know if your pollinator highway is working. Keep a simple log:
- Pick three sunny spots and three shady spots.
- Spend five minutes each week observing each spot.
- Note the number and types of insects, blooming plants, and any new nests.
Over time, you’ll see trends—perhaps an increase in bumblebee activity or the appearance of a monarch butterfly. These observations not only validate your effort but also guide future planting decisions.
Community Impact: From Private Yards to Neighborhood Corridors
One garden can only do so much, but a network of pollinator‑friendly yards can become a regional superhighway. Share your successes on neighborhood social media groups, organize a “Pollinator Walk” for kids, or exchange seed packets with neighbors. When multiple properties align bloom periods and provide continuous habitat, you effectively create a landscape‑scale refuge that supports species that might otherwise vanish.
In fact, a recent community project in a nearby town transformed a whole block into a Pollinator Path by coordinating planting schedules across 12 homes. Within two years, resident counts of native bees rose by 45%, and local farmers reported improved pollination rates on adjacent fields. It’s proof that small, coordinated actions can ripple outward.
Getting Started: A 4‑Week Action Plan
Ready to roll up your sleeves? Here’s a concise roadmap:
- Week 1 – Survey & Sketch: Walk your yard, note sun exposure, and draw a rough map highlighting dead zones and potential hotspots.
- Week 2 – Plant Selection: Choose 5–7 native species covering early, mid, and late season. Order seeds or small plants from a reputable native nursery.
- Week 3 – Soil Prep & Installation: Loosen soil, add compost if needed, and plant according to each species’ depth requirements. Install bee hotels and a small water source (a shallow dish with pebbles).
- Week 4 – Mulch & Monitor: Apply a thin layer of shredded bark or leaf mulch, set up a drip line, and start your observation log.
Within a month, you’ll have a budding oasis that will continue to grow in complexity and beauty over the years.
Conclusion: The Ripple Effect of a Single Yard
Turning your backyard into a pollinator highway isn’t about becoming a horticultural guru overnight. It’s about making intentional, incremental choices that align with nature’s rhythms. Each native flower, each solitary bee hotel, each splash of water, adds a stitch to a larger tapestry—one that benefits your garden, your neighborhood, and the broader ecosystem. So the next time you hear a low hum above your patio, know that it’s not just a bee; it’s a traveler on a highway you built.

Paul Flynn is a versatile freelance writer equipped with a diverse skillset and a portfolio that reflects his wide-ranging interests and expertise. From crafting compelling website copy and engaging blog posts to delivering in-depth articles and meticulously researched reports, Flynn demonstrates a remarkable ability to adapt his writing style to suit various audiences and purposes.
Related Posts
Regenerative Outdoor Spaces: Turning Your Yard into an Ecosystem
Learn the principles of regenerative gardening, from soil health and water capture to wildlife-frien... Read More
Cultivating Year‑Round Aromas: How to Build an At‑Home Scent Garden
Discover how to design an aromatic garden that delivers fresh, natural perfume all year, using herbs... Read More
Nighttime Backyard Oasis: A Guide to Stargazing and Relaxation
Discover how to transform your backyard into a starlit sanctuary with low‑light plants, subtle lig... Read More
Top Posts

Beyond the Itinerary: How Sensory Storytelling Redefines Modern Travel
Travel isn’t just about sights; it’s about the full sensory experience. Discover a framework for sensory storytelling that transforms trips into vivid, memo...Read More

Redesigning Employment: Turning the Job into a Personal Journey
Learn to treat your role as a personal project, integrate structured sabbaticals, leverage AI mentors, and build a learning portfolio that turns employment into...Read More

AI‑Driven Personal Development Plans: The New Career Accelerator
Learn how AI‑powered personal development plans turn career growth into a data‑driven, continuous journey, giving you a competitive edge and aligning daily ...Read More

Crafting a Nighttime Garden: Light, Sound, and Scent for a Magical Backyard
Learn to create a magical nighttime garden using layered lighting, soothing water sounds, and fragrant night‑blooming plants for an unforgettable evening sanc...Read More
0 Comments
Post Comment
You will need to Login or Register to comment on this post!